Testing the graphical user interface (GUI) is one of the most important task of the functional testing phase, as its quality will often greatly influence the customer opinion of your application. In this article, Denis Markovtsev discusses the different types of GUI testing and presents the best practices to automate this activity.
Author: Denis Markovtsev, Inflectra Corporation, http://www.inflectra.com/
Graphical User Interface Testing (GUI) testing is the process of ensuring proper functionality of the Graphical user interface (GUI) for a specific application. This involves making sure it behaves in accordance with its requirements and works as expected across the range of supported platforms and devices.
Why is GUI Testing Important?
Modern computer systems are generally designed using the ‘layered architecture approach’:
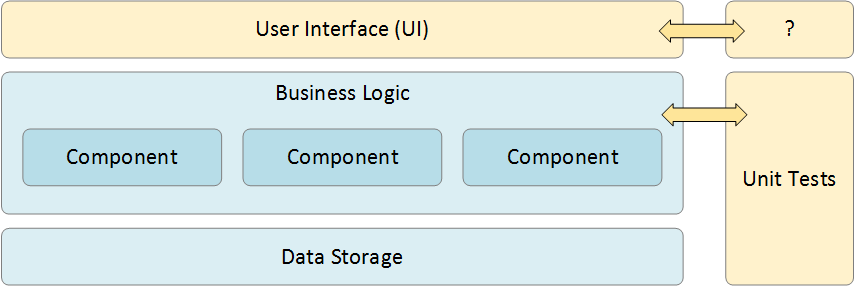
This means that the core functionality of the system is contained within the “business logic” layer as a series of discrete but connected business components. They are responsible for taking information from the various user interfaces, performing calculations and transactions on the database layer and then presenting the results back to the user interface.
In an ideal world, the presentation layer would be very simple and with sufficient unit tests and other code-level tests (e.g. API testing if there are external application program interfaces (APIs)) you would have complete code coverage by just testing the business and data layers. Unfortunately, reality is never quite that simple and you often will need to test the Graphical User Interface (GUI) to cover all of the functionality and have complete test coverage. That is where GUI testing comes in.
Testing of the user interface (called a GUI when it is graphically based vs. a simple text interface) is called GUI testing and allows you to test the functionality from a user’s perspective. Sometimes the internal functions of the system work correctly but the user interface doesn’t let a user perform the actions. Other types of testing would miss this failure, so GUI testing is good to have in addition to the other types.
Types of GUI Testing
There are two main types of GUI testing available:
- Analog Recording
- Object Based
Analog Recording
This is often what people associate with GUI testing tools. With analog recording, the testing tool basically captures specific mouse clicks, keyboard presses and other user actions and then simply stores them in a file for playback. For example, it might record that a user left-clicked at position X = 500 pixels, Y = 400 pixels or typed the word “Search” in a box and pressed the [ENTER] key on their keyboard.
Relative Analog Recording
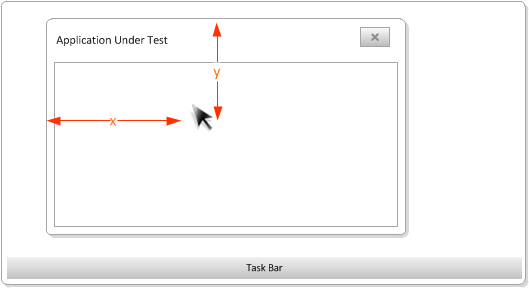
Relative analog recording is one type of analog recording where the positions of interaction events are recorded in relation to the top-left corner of the application’s window:
Absolute Analog Recording
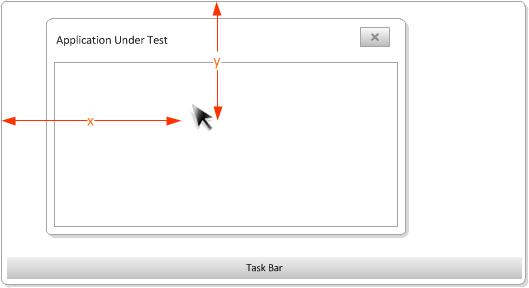
Absolute analog recording is the other main type of analog recording. Here, the positions of events are recorded relative to the top-left corner of the system screen.
The main benefits of analog recording are:
- It works with virtually all applications regardless of the technology or platform used. Nothing is required of the application developer to make it testable.
- It is quick to write such tests and as long as the GUI is stable and you can guarantee the screen resolution and window position, it can be a good way to test older applications that are not under active development
However, there are several major drawbacks to analog testing:
- The tests are sensitive to changes in the screen resolution, object position the size of windows, and scrollbars. That means you need to spend extra effort making sure you can standardize such factors.
- The tests are not intelligent; they don’t look for specific objects (e.g. the Submit button) but are just a series of recorded gestures. So if you change the UI (e.g. move a button, or change a button to a hyperlink) in any way, the tests will need be rewritten. For this reason, analog tests are referred to as “brittle”.
- When analog tests perform an action, there is very limited feedback since the testing tool is just clicking at a coordinate or sending a keypress – the tool does not understand if the application worked correctly, making human validation essential.
Object Based Recording
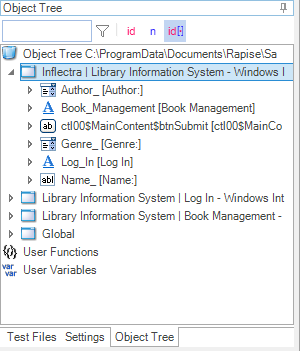
When you use object based recording, the testing tool is able to connect programmatically to the application being tested and “see” each of the individual user interface components (a button, a text box, a hyperlink) as separate entities and is able to perform operations (click, enter text) and read the state (is it enabled, what is the label text, what is the current value) reliably regardless of where that object is on the screen.
The main benefits of object based learning are:
- The test is more robust and does not reply on the UI objects being in a certain position on the screen or being in the top-most window, etc.
- The test will give immediate feedback when it fails, for example that a button could not be clicked or that a verification test on a label did not match the expected text.
- The tests will be less “brittle” and require less rework as the application changes. This is especially important for a system under active development that is undergoing more UX changes. For older, legacy applications this may be less important.
However, there are some drawbacks to this approach:
- The testing tool needs to have specific support for each of the technologies being used in the application. For example, if you have a web page that contains a Java applet and a Flash application embedded, you would need to have a testing tool that understands all three technologies (Java UI Toolkit, Flex Runtime and the HTML DOM).
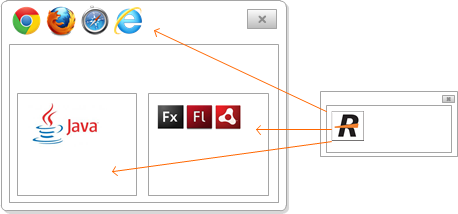
- For some technologies (e.g. Flex, Flash) the developers need to add instrumentation to their code so that the testing tools able to “see” the UI objects. If you don’t have access to the source code of the application, then it’s not possible to test it.
- Writing the tests may take more skill than simply clicking and pointing, you need to be able to use Spy and inspection tools to navigate the object hierarchy and interact with the right UI elements.
Which Type of Testing Should I Use?
The best practices are to use Object Based recording that is more robust and reliable where possible and then use Analog recording to “fill in the gaps” where nothing else works.
Challenges with GUI Testing
Regardless of the approach taken, there are some general challenges with GUI testing:
- Repeatability – Unlike code libraries and APIs which generally are designed to be fixed, user interfaces of applications tend to change significantly between versions. So when testing a user interface, you may need to refactor large sections of your recorded test script to make it work correctly with the updated version.
- Technology Support – Applications may be written using a variety of technologies (e.g. Java or .NET) and may use a variety of different control libraries (Java AWT vs. Java SWT). Not all control libraries are as easy to test and specific testing tools may work better for some libraries than others.
- Stability of Objects – When developers write an application, their choices can determine how easy an application’s GUI is to test. If the objects in an application have a different ID value every time you open a Window that makes it much harder.
- Instrumentation – Some technologies are designed to be tested without any changes made to the source of the application, however in some cases, the developer needs to add special code (called instrumentation) or compile with a specific library to enable it to be tested. If you don’t have access to the source code in such cases, that limits the testing options.
Best Practices for GUI Testing
1. Upfront Technology Assessment
It is generally recommended that you perform an early assessment of the technology that the application uses and see which UI controls and widgets are being used. In many cases you will have some non-standard UI controls and elements that testing tools may struggle to interact with. You need to do this assessment upfront before selecting a tool.
For example, on a sample Microsoft Windows system, the following different automated testing technologies are available:
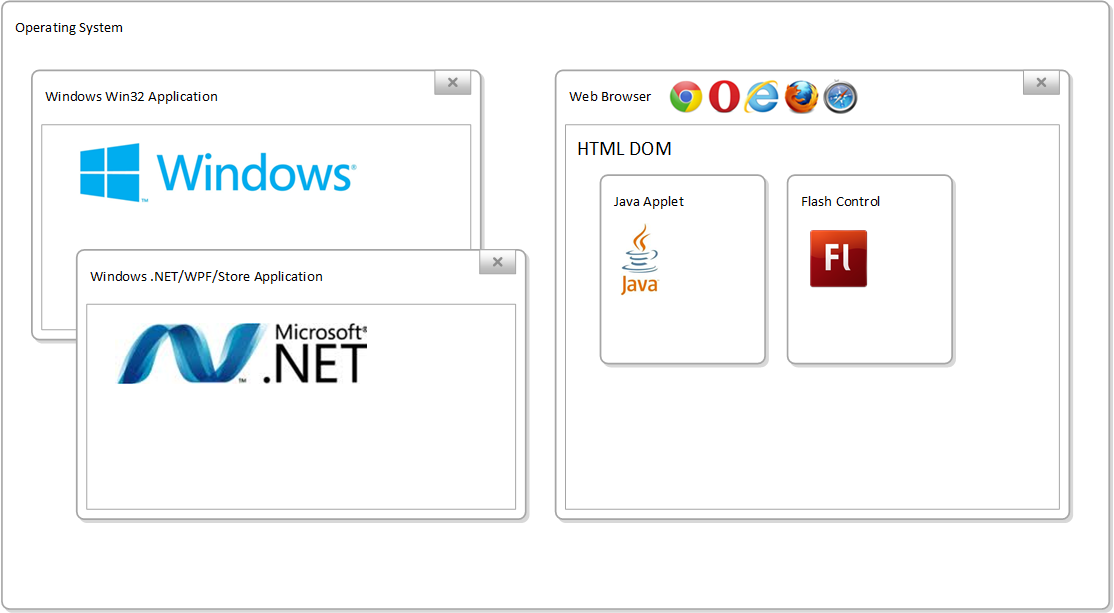
Each technology that your application uses may require a different testing library that can understand how to recognize the UI objects, for example:
- Microsoft Active Accessibility (MSAA). This is an API developed by Microsoft originally designed for visually impaired users to enable screen-readers and other assistive technologies to allow them to see the screen. It was adopted by testing tools as a reliable way to see objects inside a GUI
- Microsoft UIAutomation. This is the replacement API developed by Microsoft in Windows Vista (and later) to replace MSAA and allow testing tools to connect to objects in the Windows GUI and perform operations on those objects.
- Java Reflection. When you have applications running in a Java VM that use either the AWT or Swing GUI libraries, the testing tool needs to connect to the running Java VM and use the reflection API to be able to understand the objects that are in use and test them.
- .NET Reflection. When you have applications running in the Microsoft .NET CLR that use are 100% using managed code, the testing tool can connect to the CLR and use the .NET reflection API to get more precise information than would be provided by just MSAA or UIAutomation.
- Selenium WebDriver. When you are looking to send commands to a web browser and to inspect the web browser Document Object Model (DOM), the WebDriver API is available on most browsers to give programmatic access. However it does not let you record user actions.
- Web Browser Plugins. Most (but not all) web browsers support a plug-in architecture that lets testing tools interact with the loaded web page, inspect the browser DOM, but unlike WebDriver, also record user interactions
- FlexLoader. This technology lets you load a compiled Flex/AIR/Flash application inside a testing container so that the objects in the application can be tested without needing to recompile the source code.
- FlexBuilder. If you are testing a Flex/AIR/Flash application and have access to the source code, this API is a form of instrumentation that can be compiled into your application and then the application can be tested without any special loading techniques.
- Apple UIAutomation – This is the original testing API provided by Apple to test iOS devices. It was written in JavaScript and has now been depreciated and succeeded by Apple XCUITest.
- Selendroid – This is the original testing API provided by Google to test Android mobile devices. It has now been replaced by Android uiautomator
- Apple XCUITest – This is the newest testing API provided by Apple for iOS devices. It was introduced in Xcode 7 and includes significantly better debugging than UIAutomation and includes the ability to record user events.
- Android uiautomator – This is the current testing API used to test Android applications, it is available on Android API >= 17 and is used by most modern mobile testing tools.
2. Be Realistic About What to Automate
In theory you could automate 100% of your manual tests and replace with automated GUI tests. However, that is not always a good idea! Automated tests take longer to write than manual test since they have to be very specific to each object on the page. With experienced manual testers, you can write very high level instructions (“test that you can reserve a flight”) and they can test lots of combinations and follow their intuition much more quickly than you can record all the different automated tests.
However, computers are really good at automated mundane tasks. For example, testing that you can click on every possible page in the application and do it on all flavors of the operating system, web browser and screen resolution would take forever for a human, but would take an automated testing tool no time at all. Similarly, testing the login page with 1,000+ different login/password combinations is much more efficient for a computer to do.
So let’s say that we have decided to automate 20% of our test cases, great! There is only one problem – 20% means 20% of your test cases. But which 20% you may ask?
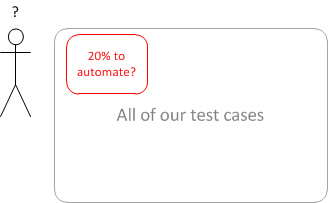
How about the 20% of test cases used most often, that have the most impact on customer satisfaction, and that chew up around 70% of the test team’s time? The 20% of test cases that will reduce overall test time by the greatest factor, freeing the team for other tasks. That might be a good place to start.
These are the test cases that you dedicate many hours performing, every day, every release, every build. These are the test cases that you dread. It is like slamming your head into a brick wall – the outcome never seems to change. It is monotonous, it is boring, but, yes, it is very necessary. These test cases are critical because most of your clients use these paths to successfully complete tasks. Therefore, these are the tasks that pay the company and the test team to exist. These test cases are tedious but important.
3. Avoid the Perfection Trap
Sometimes when automating an application, you will meet a special UI control that is not handled by the testing tool that you are using (or maybe is not handled by any testing tool that you have tried). If you look for perfection, so that every single possible object on the page can be tested automatically you may end up frustrated, wasting time and possibly resulting in abandonment of the entire automation effort.
The solution is to be creative, if you can use analog recording for that one control, then maybe that is the best solution. Sometimes you may need to use a combination of techniques to simulate the user action, using special keystrokes to avoid the button in question. The goal is to improve your test coverage and make sure you find problems that need fixing, if that involves some creative solutions that are not “perfect”, so be it, the overall goal is still being met.

What Features Should I Look for in a GUI Testing Tool?
Obviously the first answer is to choose a tool that can automate the specific technologies you’re testing, otherwise your automation is doomed to fail. Secondly you should choose a tool that has some of the following characteristics:
- Good IDE that makes it easy for your automation engineers to write tests, make changes, find issues and be able to deploy the tests on all the environments you need to test.
- A tool that is well supported by the manufacturer and is keeping up to date with new web browsers, operating systems and technologies that you will need to test in the future. Just because you used to write your application on Windows 3.1 using Delphi doesn’t mean it will be that way forever!
- An object abstraction layer so that your test analysts can write the tests in the way most natural for them and your automation engineers can create objects that point to physical items in the application that will be robust and not change every time you resort a grid or add data to the system.
- Support for data-driven testing since as we have discussed, one of the big benefits of automation is the ability to run the same test thousands of times with different sets of data.
However whichever tool(s) you choose to use, make sure that your testers can try them out for at least 30 days on a real project to make sure they will work for your team and the applications you are testing.
About the Author
Denis Markovtsev is a lead developer in Inflectra test automation group. He is focused on desktop and mobile technologies with a focus on testing different types of GUI, including Microsoft Windows, Adobe AIR, Apple iOS, Android and Java. This article was originally published on https://www.inflectra.com/Rapise/Highlights/GUI-Testing.aspx and is reproduced with permission from Inflectra.

